
Reveiwing the
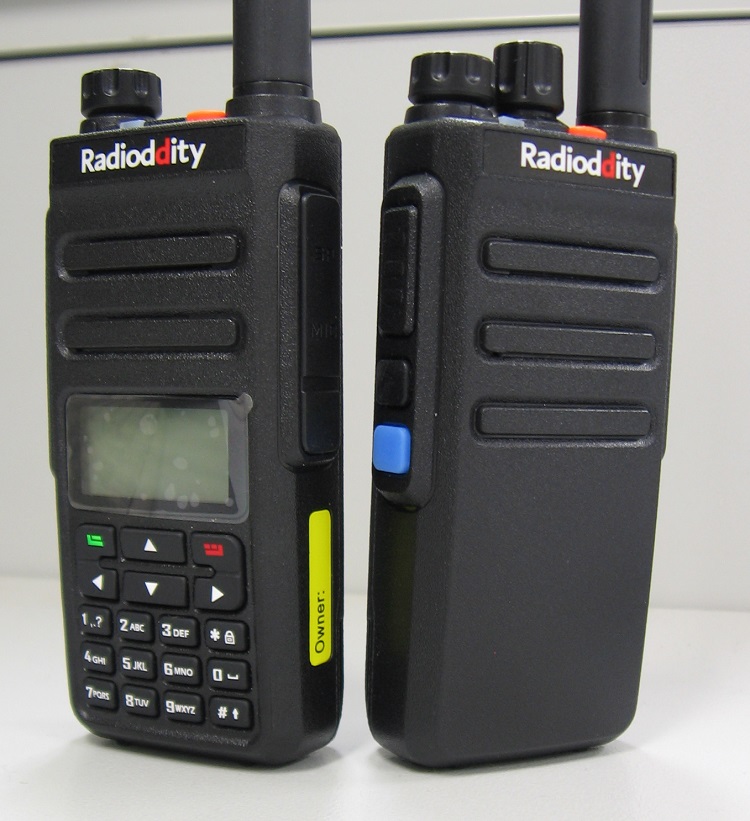
Radioddity GD-77
dual band DMR digital handheld radio funny name, serious radio
GD-77 at left, GD-77S at right
Introduction:
The world is going digital. Throw away your audio cassettes, your VCR tapes; welcome to the world of mp3 players, DVD & Blu-ray discs and online streaming. The two way radio & amateur ’ham’ radio worlds are moving the same way, too: DMR or Digital Mobile Radio - an open standard for digitally transmitting voice & data - is gaining in popularity. If you want to play in this digital world, you’ll be needing a digital radio.
Radioddity (pronounced as Radi-oddity or Ray-dee-odd-it-ee, not radio-ditty) produces the GD-77, an excellent little entry level dual band FM/DMR handheld radio that represents phenomenal value for money. But if you’re thinking that this is just another ’cheap & nasty’ Chinese radio, you might want to have a closer look. The GD-77 actually has FCC Part 90 approval, and has been independently tested to meet minimum emission standards for spectral purity, stability, and other critical parameters. Plus the GD-77 comes off the same assembly line as another well respected manufacturer in the radio industry, so the Radioddity GD-77 does have some pedigree.
Who might want to use a GD-77?
The main demographic that the GD-77 is aimed at is the ham radio user. It’s bargain price, dual band VHF & UHF capabilities, decent RF performance and of course the ability to work with DMR systems are all attractive attributes for the ham radio operator, but it lacks the complete flexibility that some hams might desire. But then, the same is also true of all other similar DMR handheld radios. The latest firmware upgrade to the GD-77 adds a VFO mode, which is a very welcome inclusion for ham radio operators. I would expect all but the most demanding of ham radio operators would be very pleased with the GD-77 once they take an objective look at one.
As mentioned above, the GD-77 has official approval by the FCC for Part 90 business and commercial two way radio use, in the USA at least. For the business user who doesn’t want all the ’bells & whistles’ there is a simplified version of this radio, the GD-77S which has a top panel 16 channel selector knob in lieu of a keypad and LCD display - ideal for the sort of user who just needs a radio to talk on a few channels or DMR talkgroups. The GD-77S uses the same core circuitry as the regular GD-77, and adds voice prompts to assist the user operate the controls. This also makes the GD-77S very suitable for vision impaired users, with exeptionally clear and articulate English voice prompts, annuncuiation of each button press function - you can even have the radio announce the frequency and/or DMR parameters of the currently selected channel.
The third type of user that may consider the GD-77 is the scanner radio enthusiast. As more radio users move to DMR, traditional analogue radio scanners are starting to gather cobwebs. New multi-digital mode scanners that can receive DMR are available, but at a very significant cost. The GD-77 offers another way to hear these DMR transmissions without breaking the bank. But like amateur radio operators, a scanner user may find the lack of total flexibility they’re used to finding in a scanner a bit limiting. For example, only one memory ’bank’ can be scanned at a time and you’ll need to work out certain parameters first such as DMR colour code and timeslot number before being able to program the GD-77 to listen in on a particular radio service.
Who shouldn’t use a GD-77?
Make no mistake, any DMR radio including the GD-77 requires some fairly complex configuring with software to make them work. This process can be pretty daunting for those not technically minded. If you’re expecting a radio that you can ’plug n play’ or only spend 5 minutes reading the manual and getting on air quickly, you’re likely to give up in frustration.
But if you don’t mind climbing a steep learning curve, once you do crack this nut the GD-77 is a sweet little DMR radio, and will reward your efforts with many of the features and capabilities of a DMR radio that has a much higher price tag.
Busting some myths about the GD-77
Myth #1: The GD-77 is very buggy
Not any more it isn’t. With the release of firmware V3.1.1 a very large number of bugs were fixed, and only four known bugs now remain, which Radioddity have said they will fix.
Myth #2: The GD-77 won’t work on repeaters
Not true. Some earlier models from Baofeng and the first version of the GD-55 wouldn’t work properly with repeaters, but the GD-77 is fully compatible.
Myth #3: The GD-77 is hard to program
Actually, there is some truth to this one. However ALL DMR radios are hard to program, they are complex by nature and require a bit of knowledge and thought to be put into how they are programmed. Seeking assistance from other knowledgable owners will help ease the burden.
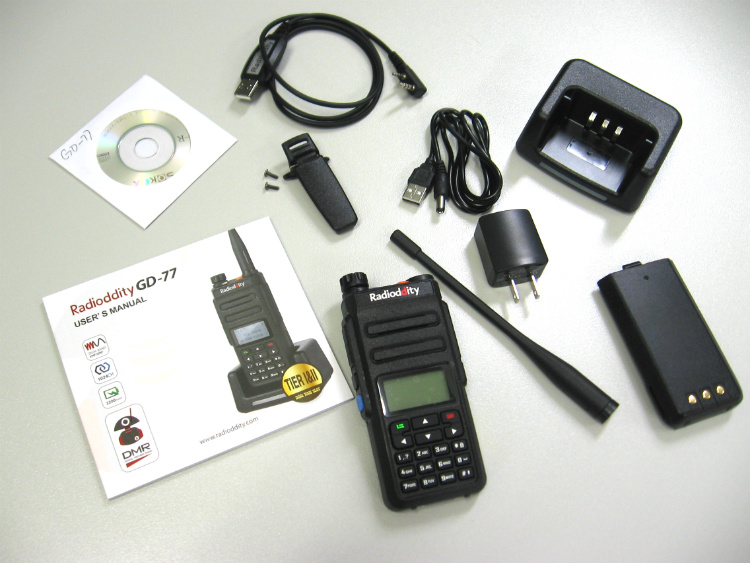
What you receive in your GD-77 kit
Delivery:
Ordering my GD-77 through Radioddity’s Amazon listing was the first time I’d ever used Amazon and I was well chuffed with the experience. Our local postal system is notoriously slow, yet the GD-77 arrived in 10 days, from quite literally the other side of the world, with full traceability on the delivery. It is, as they say, "the way to go."
When your GD-77 arrives, the box contains the radio itself, a 2200mAh Li-ion battery, a charger base and power supply, a flexible dual band antenna, USB programming cable, a belt clip, a CD with programming software, and an instruction manual, all neatly packed with some vacuum formed internal packaging.
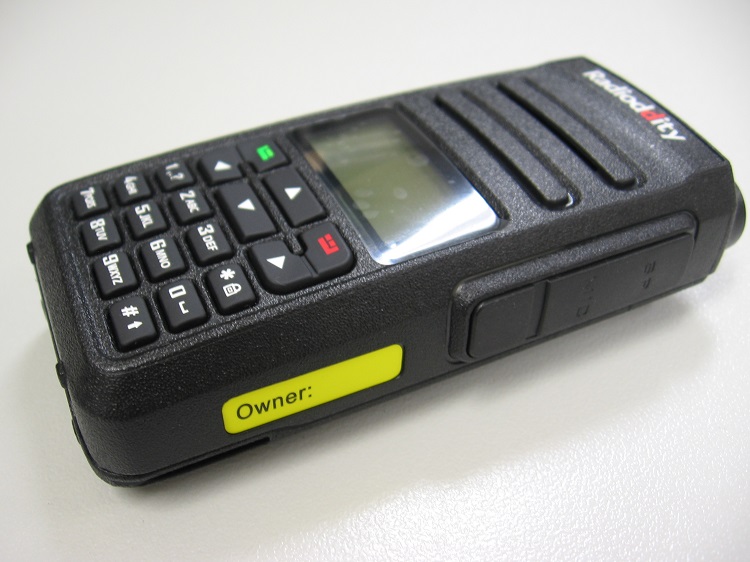
Physical construction & appearance:
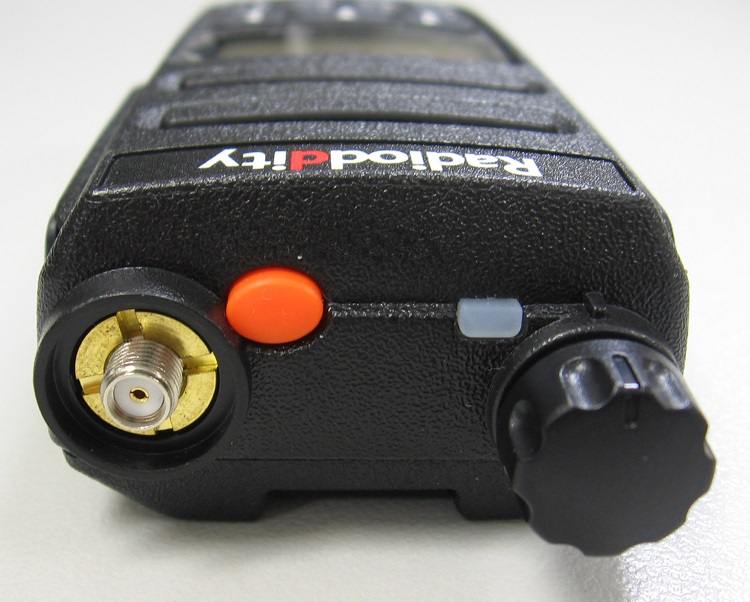
Styling of the GD-77 is neat and tidy, and quite reminiscent of Motorola DMR handhelds, looking both professional and business-like, as opposed to some other entry level radios that look like they are a bit of a toy. The shell is a good quality injection moulded plastic with an alloy chassis that doubles as the RF shield - exactly the same arrangement as used by other top shelf manufacturers. There’s a good tactile feedback to the keypad and side buttons, and the dot matrix LCD display is brightly backlit with a white LED, making it easy to read in both bright sunlight or in the dark. A top panel multi-colour LED indicates what the radio is doing: red for transmitting, emerald green for receiving a signal, and flashing yellowish-green for scanning. The LED will also illuminate during PC reading and writing to confirm it is communicating properly with the programming software. Also on the top panel is an orange button, intended to be used as an ’emergency’ button and on early versions of the GD-77 is a bit harder to activate (as you’d want an emergency button to be) but later versions made this button a bit taller and easier to push, which will please those people wanting to program this button for other uses. A female SMA socket is used for the antenna connector, so if you want to use an aftermarket antenna, it’ll need to be an SMA male type. There’s also a speaker microphone connection on the side, which uses the standard Kenwood / Baofeng configuration.
While I won’t go so far as to call the GD-77 ’rugged’ in that it would survive being run over by a fork lift truck, it is well designed and built from a mechanical point of view, and should be able to take the occasional drop or knock - indeed one of my test units has fallen a metre onto a hard floor on more than one occasion and it still works just as well as day one. The GD-77 is solid without being heavy, and I feel it’s a bit better built than what we are used to seeing from other entry level radios. Internally, the electronics follows good design principles eg: adjacent RF inductors all mounted at right angles to one another to minimise interaction, good bright solder joins on the SMD components which have been accurately placed, and so on. Top marks there.
The only other comment to make here is that the plastic used for both the display lens and the shell of the radio is a bit soft and has some ’give’ when subjected to impact, and so might be less prone to splitting in this situation, but that does also mean that it will show up any scratches and bumps more readily than a harder plastic compound would.
NB: There is a version of the GD-77 with a reverse / inverse LCD screen, that is to say instead of the black letters on a white background, the GD-77BB version has white lettering on a black background. If that is your personal preference, then seek out the GD-77BB.

About the included antenna:
As part of your new GD-77 kit, there’s a dual band flexible antenna included which is 165mm / 6.5 inches long, and it is certainly resonant at VHF and UHF, though the actual frequencies it’s resonant at are a little off for ham radio use: 149 MHz (VSWR 2.1 : 1) and 380 MHz (VSWR 1.4 : 1) - although to be fair, the UHF resonance is pretty broad according to the Wiltron antenna analyser used for the test. In practice however, little difference was noted on air between the included antenna and a Diamond SRH-519 antenna. The included antenna has a ’skirt’ on the bottom that makes it a fairly tight fit in the lip around the GD-77’s SMA antenna socket, and at times it can feel as if you’ve cross-threaded the antenna. When fitting the antenna on the GD-77, go slowly and be sure you have correctly mated the threads, but don’t be surprised if it feels like it’s a tight fit - it’s meant to be that way.
About the included charger:
Much has been said about the hardware supplied to charge the GD-77. The charging cradle has a two colour LED indication in its base: red for charging, and green for fully charged, nice and simple. The power supply that plugs in to your wall power outlet is a little unusual, however. That power supply delivers 12 volts, but uses a USB connector and cable to connect to the charging base. Immediately this raises two questions: can a regular USB port be used to charge the GD-77 battery? No, it can’t. And what might happen if you use this 12 volt ’USB’ charger to power a true USB device? Nothing good, that’s for sure. Some newer GD-77s have been shipping with a more conventional power supply without the USB socket as it’s connector to reduce this confusion, but if you find your GD-77 is delivered with a power supply that does have a USB connector, the simple solution to prevent any accidental damage to other devices is to glue the USB cable into the power supply, that way there’s no possibility of it being used and inadvertently frying some other electronic device.
Some quick specifications:
Modes: FM 12.5 kHz and 25 kHz, and DMR ETSI Tier 1 and Tier 2, including DCDM
Channels: 1024
Digital contacts: 1024 for talkgroups, 10921 for individual contacts
Frequency bands: 136-174 & 400-470 MHz (Expandable to roughly 130-180 & 390-520 and can add a new RX only band 200-280 MHz via mods)
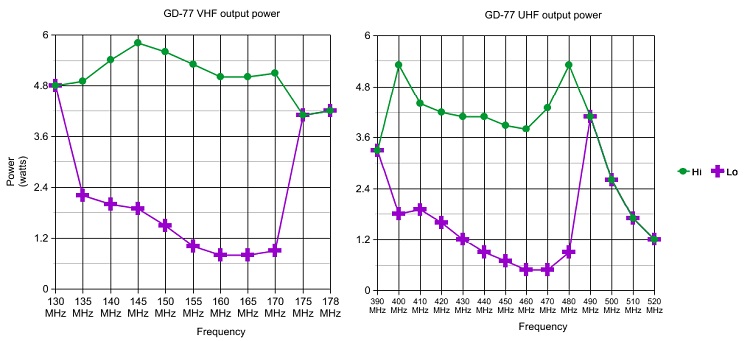
Power output: 5 watts high, 1 watt low
Scanning speed: 4.5 channels per second
Dimensions (not including antenna):
123mm/4.8 inches height (including top knob: 133mm/5.2 inches height)
59mm/2.3 inches wide
31mm/1.2 inches deep
Weight: 260g / 9.2 ounces, which includes battery & antenna

Programming / configuration:
We’ve already noted that the visual appearance of the GD-77 is somewhat similar to Motorola DMR radios, and this trend continues with the programming; people refer to the programming software as "CPS" and the configuration file as a "codeplug" - both Motorola terms. If you’ve previously had some experience in programming other DMR radios or Motorola radios in general, you’ll likely have no trouble getting the GD-77 up and running. The only trick to note is that the GD-77 requires you to specify a RX group list for each and every DMR channel. If you set the RX group list to ’none’ the radio doesn’t automatically assume to use the TX group contact for RX as well, and you’ll hear nothing. Just a minor quirk, really.
If this is your first time programming a DMR radio, you might want to get advice from someone who has done so before and can help guide you through the process. Without turning this review into a ’how to’ for DMR programming, the general sequence is to first program your DMR talkgroups you’ll need into the ’digital contacts.’ Next, build up your RX group lists with those digital contacts (talkgroups) as you like - some like to lump many talkgroups into a few RX group lists and attach that to multiple DMR channels in a ’broad brush’ approach, while others like to use one RX talkgroup per RX group list, and have one unique RX group list per channel. It’s your choice to use what suits you, either way works fine. Then you program your channels with frequencies etc. If your channel is a DMR one, then here is where you attach a RX group list to the channel, as well as a digital (TX) contact. After defining your channels, you then nominate which channels go in which ’zone’ or channel bank if you prefer to use that term. If you also want to scan channels, you’ll need to work out which channels you’d like to scan, define them in one or more scan lists, and then go back into your channels and also nominate each channel to a scan list there as well. Yes, that sounds like doubling up on doing the same thing twice, but it is necessary to prevent unexpected results while scanning. But wait, there’s more yet - you have to program up your digital ID, define button functions, and other personal preference stuff for your GD-77. OK, now you can write that to the radio. If you also want to put in any individual private contacts, use the separate ’ActiveClient’ PC software to import a CSV contact list and send that to the radio as well. Phew! Told you it was a bit complicated...
It helps that Radioddity have included some import & export tools for channels, the 1024 available digital contacts for talkgroups and the approximately 10000 private digital contacts, though ’grooming’ your files into the right format that the software is expecting for importing can take some time to get right, too. Most professionals in the radio industry recommend entering as much data by hand for best results, so perhaps restrict your use of importing to only the private digital contacts if you find you have troubles.
Of course, if you’re lucky enough to have someone local who already has a ’codeplug’ or pre-made configuration files for a GD-77, you can borrow theirs and write it to your radio. You can always make minor tweaks here and there to suit your own tastes before committing the configuration to the radio.
In use - how well does it work?
The question on everyone’s lips must surely be "OK, so exactly how good does a sub $100 dual band DMR radio work?" Let’s not keep you in suspense any longer - the answer is surprisingly good. With a full battery and battery save functions enabled in the software, a GD-77 will go all day and half way into the next one on that one charge. The receive audio is very good on FM and especially nice on DMR, very clean and crisp without sounding tinny, much better than you’d expect considering the internal speaker is only 30mm diameter. Connect an external speaker of about 100mm via the speaker-microphone socket and you’ll get absolutely superb sound out. Another positive attribute is that the volume can be turned all the way up to maximum without any hint of harshness or distortion greeting your eardrums. The rated audio output is 1 watt, and is enough to be clearly heard in a vehicle cabin at highway speeds. Every GD-77 owner agrees that the transmitted audio for both FM and DMR is crisp and clear, too. Transmitted RF power averages 5.1 watts high / 1.6 watts low power across the VHF band, and an average of 4.6 watts high / 1.0 watts low power across the UHF band, according to the Hewlett Packard 437B power meter. There are separate VHF and UHF RF power output sections, and each bands output transistor has a silicon rubber block to transfer heat to the chassis for heatsinking purposes.
Inside many of the current generation of entry level handheld radios - and even some full size mobile radios! - is a ’radio on a chip’ that is responsible for frequency synthesis, complete receiver from front end through to audio processing, initial transmitted signal generation including modulation, CTCSS and DTMF encoding & decoding, squelch, VOX and more. Thanks to the power of SDR (Software Defined Radio) what took many hundreds of discrete components, IF filters and a handful of integrated circuits, can now be done on just one single tiny IC. You’ll find one of these very clever little ICs in the GD-77, too. The benefits of using this SDR based receiver arrangement are obvious: the radio can be smaller & cheaper overall to manufacture. The GD-77 receiver qualities are quite impressive too: an average of -122 dBm for 10dBQ (about 0.18uV for 12dB SINAD) on VHF and then -120dBm (about 0.22uV for 12dB SINAD) for UHF as measured on a Hewlett Packard test set. Adjacent channel rejection is pretty good too, being listed as better than 60dB down at 12.5 kHz off-channel. There is a downside, however: strong signal handling isn’t very good. When a large off-frequency signal is presented to the GD-77 receiver, it effectively becomes completely deaf. No weird mixing products heard out of the speaker, no interference - just dead silence. This can lead to some confusion if you try to attach an external high gain base station antenna to the GD-77. A bigger antenna should mean a bigger signal, right? That’s not always the case with these SDR based receivers... too much signal can overload them to the point where they simply shut down. So take my advice: don’t try to use the GD-77 as a base station (no handheld radio should be used in this manner in my opinion, anyway) and be aware that in very high RF fields - standing next to another transmitter, for example - your receiver will overload and be temporarily rendered deaf. It should be noted that this problem is common to all radios using this SDR based hardware, not just the GD-77.
One other thing you may notice about the receiver is that, as the signal strength changes rapidly, you will hear a background clicking noise, a bit like an old Geiger counter. This effect is most noticeable when you use the radio in a moving vehicle and with narrowband 12.5 kHz channels; this is also an artefact of the SDR hardware, and again isn’t unique to the GD-77.
There were a couple of other very minor issues that I found annoying: the little signal meter in the top left corner does work, but only has a range of 6dB from no indication to full, which is far too little to be of any practical use. The other is that in FM mode, there isn’t enough hysteresis to the squelch action, making a weak signal very choppy to listen to. (Both these traits can be fixed by software tuning modifications, however)
The user interface is almost exclusively menu driven, and is easy to navigate. There’s three buttons which you can program - two at the side below the PTT and the top panel orange button; you can assign various functions to them such as alert tones on/off, zone (channel bank) select, power output high/low, scan on/off, nuisance temporary delete, battery voltage display, repeater/simplex, VOX on/off, privacy (encryption on DMR) on/off and monitor mode on/off. The monitor mode needs a little elaboration: on a regular FM analogue channel, this will open the mute, but if you press monitor while on a DMR channel, you activate the so-called ’promiscuous’ mode, which will enable the radio to hear any active talkgroup on the programmed colour code and timeslot, whether you have that talkgroup programmed in your contact list or not. It must be stressed that you have to have the correct colour code & timeslot programmed first for this to work. A very handy feature!
When in channel mode, you’ve three choices on how to display the programmed channels: channel name, frequency for the channel, or sequential channel number. Which way you decide to display your channels can be set via the radio’s menu. Another very useful available feature is the VFO mode, activated by pushing the right arrow button, and you can even activate a VFO search by pressing the scan button.
Dual VFO or channel implementation is nearly mandatory these days, and the GD-77 implements this using the ’double wait’ feature, where you have three choices:
1) Off where only one channel or VFO frequency is displayed;
2) Single-wait where two channels or two VFOs or even one of each is displayed, and you manually switch between which is active. Only the active VFO frequency or memory channel is received. Think of it as being a quick way to switch between one of two active VFOs or memory channels;
3) Double-wait is much the same as single-wait but the radio quickly scans both the active and inactive VFOs and/or memories in the background, and passes audio once a transmission is found. This doesn’t mean that the GD-77 can receive both at the same time, though. Also bear in mind that you can’t scan memories in double-wait mode.
If you have the need to change or edit a channel on the fly, the GD-77 has you covered there, too. TX and RX frequencies, repeater offset, DMR colour code, timeslot and channel name for an existing channel can all be changed via the radio’s menu without the need for a programming cable or PC. It’s a shame you can’t edit talkgroup number, or edit a channels scan membership status (other than nuisance delete) via the menu. Nor can you add new channels via the radio’s controls, though you can overcome that by programming a few spare channels, ready to edit when you need them.
Firmware & CPS software:
Like so many other complex electronic devices on the market these days, the GD-77 is not only programmable by software to configure it to the user’s requirements, but also the firmware is upgradable as well. This means that new features, or fixes to any issues found are only a mouse click away, via a firmware update. Since the introduction of the GD-77 back in mid-2017, firmware upgrades have provided some very welcome user-requested features, such as ’promiscuous’ mode, a VFO, a big upgrade to the number of digital contacts available, and more. Radioddity have taken a different approach to the release of firmware updates. Rather than cram the GD-77 full of features they think are important, the GD-77 has been released with a good array of features as a starting point, but have left plenty of scope for future expansion. Via their Facebook support page, Radioddity have then canvassed the users to determine which are the most desirable features to implement. Along the way, reported bugs are also seen to. Some users bemoan this approach, saying that it shouldn’t be up to the users to find these problems or ask for functionality to be added. I don’t agree with that at all; with any technologically complex product that has hundreds of programmable items in software, resulting in literally millions of possible unique configurations, it is impractical for the manufacturer to test every possible combination. Instead, with firmware updates taking into account user input for both bug fixes and new features, the end user gets the opportunity to shape and mould the GD-77 into exactly the radio that they want. This is quite possibly the best aspect of the GD-77: Radioddity are very responsive to user input, and are constantly striving to improve the GD-77 for everyone’s benefit. It is most refreshing to have found a company who wants to look after their customers so well, and could not be any further from my experience with another very large and very well-known radio manufacturer who just seemed very indifferent to user problems and requests.
With over half a dozen firmware & CPS software updates in as many months, it is important to note that you need to match the CPS software version you use on the computer with the firmware version running in the radio. This is particularly important for the newest firmware versions V3 upward.
At the time of writing, the latest firmware version is 3.2.1, and this review is based on three GD-77s running that version. It is hoped that the few bugs remaining will be addressed in coming firmware releases.
What I liked about the GD-77:
Very sensitive receiver
Superb received sound quality
Great transmitted sound quality
Professional appearance, not ’toy like’ at all
Nice size, feels solid in the hand
Battery life is good, without being too big or heavy
Radioddity support very responsive and helpful
Incredible value for money
What I didn’t like:
RF front end gets overloaded easily
Moderate clicking sound with changes in signal strength on very strong signals
Signal meter of little use (fixable with mods)
Very weak FM signals are choppy to listen to, due to squelch action not having enough hysteresis (fixable with mods)
Some may find the DMR programming learning curve very steep
What might be coming in the future?
The following wish list has been submitted to Radioddity and may be implemented in future updates:
Fix remaining three bugs
Add timeslot and colour code free monitoring to ’promiscuous’ mode
Increase the number of channels per zone
Increase the number of contacts above 10921
Improve signal strength meter, possibly with a display reading in dBm
The final word:
I think Radioddity are on a real winner here. The features available, the quality and level of performance far exceed expectations given the very affordable price of the GD-77. I like it a lot. It might not be for everybody, but if you like to tinker with technology, I think you’ll like it too.
Some other useful links
GD-77 Frequently Asked Questions FAQ & answers
Absolute beginners guide to DMR
GD-77 Tuning & alignment information
GD-77 Modifications
About the author: Jason VK7ZJA has been playing with radios professionally and as a hobby for over 30 years.
I’ve no official affiliation with Radioddity other than being a satisfied user of their products
© Copyright Jason Reilly, 2018, 2019